

 VALORANT
VALORANT Champions Shanghai 2026: Full Guide, Teams, How to Watch
Here’s a full guide to VALORANT Champions Shanghai 2026, including the storylines, teams, schedule, and how to watch.
11 Sept 20265 min
Here’s everything players should know about the VALORANT map Split. Image Credits: Riot Games
Let’s explore a full guide to the VALORANT map Split, including which Agents to play and some helpful strategies.
Split is one of VALORANT‘s oldest maps. It’s been around since the game’s closed beta in 2020, so teams have had plenty of time to practice it. Don’t worry if you’re new or learning: we’ve got you covered with a full guide on everything to know, including team comps, the best Agents, and more.
Split has two sites, A and B. It’s a super dense map, with plenty of rat corners, close angles, and twisty-turny corridors. There’s a middle section with four passageways (Ropes, Mail, Sewers, and Link) that let players rotate quickly.
Split has shifted in and out of the map pool, but as of July 2026, it is in the current rotation.
The VALORANT meta is always changing, but certain Agents have always had a hold over Split because of their kits. We’ll elaborate later in the article on why we’ve made these selections, but these are the Split Agents you should be picking:
You’ll notice a lot of these appear in esports comps, like VCT Americas. If you want to see these comps run properly, watching live VALORANT is one of the quickest ways to pick up the utility timings and mid control that make them work on Split.
Controllers are super important on Split. However, you can get away with a no-Sentinel comp, and this is actually pretty common in VCT.
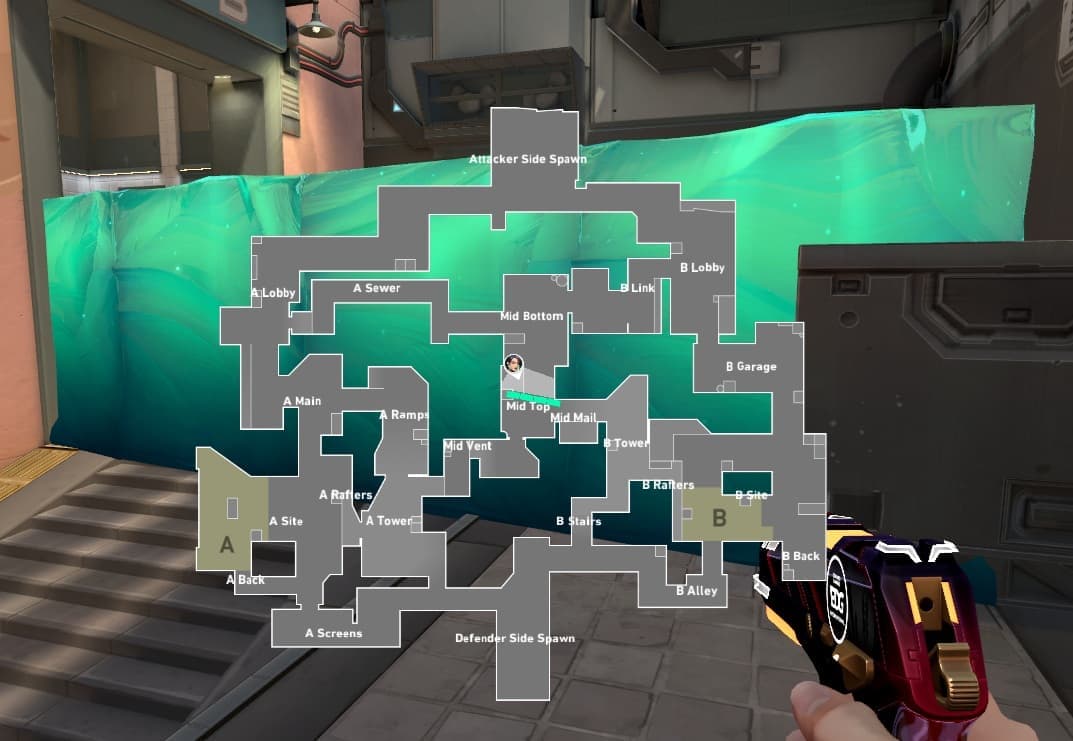
Here’s a quick minimap image with all the callouts on Split:

It’s important to note that some locations have multiple names. Most people call A Back ‘A Elbow’. Also, it’s very common to say ‘Heaven’ instead of Tower for both sites. CT generally refers to the Defender-side spawn or site exit. This is an old term from way back when in Counter-Strike (the two games share a large player pool).
Mid-map presence on Split significantly increases your chances of winning a round. This is why it’s so common for teams to take control of it early, dumping utility and putting up barriers so enemies can’t invade your territory.
This all has to do with ‘zones of control,’ a theoretical concept that applies to all types of FPS. We won’t bore you with the details of that here, but it’s an interesting rabbit hole to explore further. Basically, certain parts of an FPS map have disproportionate impact on map pressure. You can identify these zones of control on any VALORANT map if you know what to look for. These are usually places that have easy rotation pathways, and you guessed it, Split’s Mid is one of them. It directly leads to Ropes and Mail, the fastest rotate areas between sites.

Walling mid is a great way to keep control of the area. That’s why Sage and Deadlock are super common picks on the map. You can use the wall to eliminate lurkers (having a late lurk mid is quite common here).
If you place the Sage wall right, you can hop on top of it from B Mail and get an unexpected angle on opponents. Ideally, you should angle it slightly.
When you wall mid early, it has another added benefit: it frees up one player on your team to hold a site instead. For instance, if Sage doesn’t need to hold mid because it’s walled off, she can rotate straight to B Heaven and help her teammates defend against an incoming push. In the worst-case scenario where it’s a 3v5, that’s still much better odds than a 2v5.
You can apply this same concept on the attacker side, too. Even if you’re not going to push mid, it can still be good to destroy that Sage wall at the beginning of the round because it creates pressure and forces the enemy team to become more spread across the map.
Whenever you’re playing, you want to think of the map as a pie chart. If you have over 50% of the territory, you’re in a pretty good spot. On the Attacker side, your goal is to push past that 50%. On Defender, you want to maintain the 50% map space you already have. This is why if you’re at a disadvantage, it can be a good idea to reclear one side of your offense and reclaim territory instead of waiting to get pinched.
A Main is another hugely important location on Split. Getting early info here is really important, because it helps you reliably predict where the enemy team is going to push.
Most B-site pushes on Split (map) are split (strategy). It’s hard to just bum rush site from B lobby, so teams will often send a few players mid to take high ground on Heaven and help out. What does this have to do with A site, you may be asking? Well, if you don’t get any early info in A main or only spot one lurker, you can quickly rotate towards B and pay extra attention to mid.
Sova’s Recon, Skye’s dog, and Fade’s eye are all great options for this tactic. Ideally, you want info deep into A main right by the barrier, not when the enemy team is already all the way to the choke point.
Getting info deep in A main also ensures the attackers are kept confined to a single choke point. Once they have split pressure on Ramps, it’s so much easier for them to get into site. Just one Fade eye or recon can help your teammate push out to Ramps, swing, and get an early pick, halting the push in its tracks.
Also, now that you know how important this utility is, you (hopefully) won’t complain or ask why when your teammates ask you to shoot that pesky Fade eye!

B Main is terrifying on Split, we know. There are SO many flashes, and Raze util is being dumped left and right. That said, if you’re playing an Agent with a get-out-of-jail-free ability (like Jett dash, Chamber tp, or Reyna dismiss), playing a bit aggressive and getting that first pick can seriously be worth it on the defender side.
If you manage to secure one kill, fall back and change your position before re-engaging. It’s decently rare for one player to lurk up B main alone (unless the enemy is defaulting), so you’ll likely get traded if the team wants to commit. Your goal here is not to take any territory, but to defend the choke point you have. This is a great angle to hold with an Operator, Outlaw, Marshal, Sheriff, or Vandal.
For the love of all that is holy, play anti-flash when you’re contesting B main. Be ready to turn away from Skye birds and Phoenix blinds, and make sure you’re close enough to cover to fall back if you need to. It’s important to choose your angle carefully here.
Defending B Site from pushes is much, much easier if you have Heaven control. Because of the rope from site to Heaven, it’s a lot harder to retake B Heaven than A tower, and on-site enemies pose a lot more risk. It also leaves you vulnerable to split-push pinches. You shouldn’t give up this area without a fight.
If your teammate is fighting enemies as they push out of B main, don’t be afraid to aggressively push out onto Rafters and help them. Even if you’re outnumbered, their crosshairs will be split between you, lessening how much danger each person is in. You’re more likely to get a few picks and stall the push this way.
Lurking slow in Split pays off. The map’s tight corridors and vertical chokepoints make it easy to catch rotating enemies off guard. A Main and B Main funnel players through narrow paths, so it’s easy to isolate 1v1s and hard for enemies to trade. A lurker holding an angle near Mail, Vent, or Ropes can pick off anyone rotating without support. This map also rewards patience since defenders often overextend early.
Typically, your Sentinel or Controller will lurk. This means Omen, Viper, and Cypher are the most common offenders. If you’re running Cypher with an Omen on the enemy team, don’t take your Tripwires or Sage wall for granted and remember that Omen can just teleport over them, so your flank is never truly clear.
This is going to be a little controversial, but flashes alone are not enough to break through B Site’s infamous choke point. You need to split up the site with utility, creating a pathway for teammates to methodically clear every section.
There are plenty of ways to do this: Iso wall, Phoenix wall, Harbor wall, Cypher cage, and Neon wall are all great options. The best thing about them, ironically, is that they’re temporary: you just want to split the site into sections before taking it fully.
Many players have seen the viral B-main Sage wall that gets players onto site. However, controversial take, but this wall isn’t always good, and it can be better to save it for CT instead.
an assistant coach asked why this wall is bad visual and written explanation: the largest issue with the wall is it funnels all of the attackers into one choke, effectively moving the issue from B Main to B Site, where defenders will have an easier time burning utility on you because you have blocked off one of your avenues of attack and disabled your access to pillar from the nexbox side. This effectively gives the backsite and back pillar player a crossfire that the pillar player doesn’t have to worry about falling off of because of a flank from new box. This also streamlines fast flood retakes from heaven, as you can assume that if you drop from Heaven, the angles that someone can be holding you from are reduced because of the same wall. So not only is the wall not benefitting you to the max potential, (i.e. wall ct for defenders to break multiple segements), it instad hurts your team Now, for actually attacking the site with your team. The reason that double duelist was/is so popular is because it now gives you two players who can cross the choke and wrap the pillar. But for a comp like Karmine Corp (who which the original tweet is about), having just a single duelist Raze isn’t enough to full exec. Instead, you can just smoke the backsite and pillar cross, (e.g. where Omen’s default) to deny sitelines from default, backsite, etc. After smoking heaven, you can just wait for your first smoke to go down (or use viper orb), wall CT and then wrap both sides of pillar to ensure you have full site control. Or, like in my video, you could put the same smokes, but instead of waiting for the smoke to dissipate, you wrap around newbox with heavy util emphasis on back pillar and rafters, and have your raze wrap around clear hell and then nade backsite as your pinch. The lack of a smoke on CT can hurt, but isn’t necessarily a prominent position that people are playing at the beginning of the round and more of a midround position for when you are setting up for a retake. This is very similar to Lotus C, where teams will opt out of the CT smoke for a smoke in Mound to give players more angles to exit the One-way smoke. People just don’t play in CT anticipating that you will wrap New Box exposed, not that it will be exposed for long, your sage is following raze, and will wall it off Hope this helped someone learn something new!
— Rocket (@RocketBullets) July 31, 2026
There’s a more in-depth explanation in the post above, but basically, the wall makes enemy retakes a lot easier and makes it much harder to play post-plant from main. Just keep that in mind if you’re a Sage player. We know you’re already walling with the best intentions and dealing with a million teammates at 87 health begging for heals: we see you, and we appreciate you.
Split is a ratty map. Enough said. You’ve definitely heard this over and over again, so we won’t make this section long, but you need to constantly clear your corners to avoid getting diffed by a shotgun. Better yet, practice correctly swinging and entering duels. You’ll want to learn how to prefire, identify which corners are wallbangable, and hard clear these locations instead of slowly walking past. These issues happen most on A site, but are also an issue in Ropes and on the boxes to B Lobby’s left.

Since Split has so many wacky vertical spots that are hard to isolate in 1v1s, Controllers and fast smokes are crucial. Many teams opt for a double Controller comp. This makes perfect sense because the map is generally considered Defender-sided, meaning Defending teams begin with an immediate advantage. Having good smokes will help you keep that head start rolling, maintaining the space you already have. Smokes also force enemy Initiators to use utility to clear them, making site pushes much less threatening.
Viper and Omen are typically the best Controllers on Split. Viper’s toxin wall, orb, and Ultimate decay enemies as they move through them, meaning she provides Sentinel-like push stalling on an already Defender-sided map. The sites are also closed off enough for her molly and Ultimate to be effective. Meanwhile, Omen’s teleport helps him access Split’s abundance of vertical angles, and his Paranoia fits perfectly in Mid, A Elbow, and B Main. He is also a strong counter to Cypher, one of the map’s most common Sentinels.
There are also some great Omen and Brimstone one-ways on this map, so check those out if you want to really throw the enemy team for a loop. It’s important to note that Omen’s smokes have seen several nerfs, so you should hop in a Custom and double-check if the one-ways you’re finding still work. Just a side note: Cypher has some one-way cages on B-main, too!
Split is full of crazy high-low combos, stacked crates, and vertical angles. You need to be comfortable fighting enemies in unexpected positions.
A great way to improve your odds of winning Split’s high-low duels is by improving your flick aim. You can use Aimlabs, Kovaaks, or really any trainer for this. Even if your crosshair placement is perfect, you can lose many fights and struggle on the map if you’re operating without precision.
Make sure your aim isn’t on autopilot. You can always try switching your crosshair to help. A different crosshair (usually) doesn’t change how your aim is actually performing. It does, however, force your brain to lock on to new visual info and swap from an unconscious to conscious aim style.
Hopefully, this guide made you feel a little more prepared when queuing into one of VALORANT’s oldest (but most fun) maps. Stay tuned for more VALORANT esports and in-game news! Also, check out our Abyss and Lotus guides if you found this helpful.
VALORANTHere’s a full guide to VALORANT Champions Shanghai 2026, including the storylines, teams, schedule, and how to watch.
 VALORANT
A VALORANT player asked ChatGPT to recreate the game with AI, and the results are making even Breeze look like a design masterpiece.
 VALORANT
Here’s everything to know about Red Bull Home Ground 2026, including this year’s VALORANT teams, how to get tickets, and how to watch.